Ensuring Network Health with Fiber Optic Inspection
- Aug 15th 2024

As technology continues to advance, fiber optic cabling is essential to ensuring ample bandwidth for emerging applications and the transmission of ever-increasing amounts of data. Today’s networks encompass more fiber links than ever before, from service provider networks and switch and server links in the data center to backbone infrastructure in local area networks (LANs).
Ensuring maximum network performance, reliability, and availability requires fiber cabling to ensure optimal signal transmission. The cleanliness and geometry of fiber optic end faces directly impacts how well connectors mate and how well light signals can transmit across a fiber link. In fact, contaminated connectors are the single greatest cause of fiber link failure. Fiber optic inspection to ensure quality end faces is crucial to the health of your networks.
Inspecting Fiber Optic End Faces for Defects and Contamination
Fiber optic cable inspection determines the overall cleanliness and quality of fiber end faces. Defects and contamination such as scratches and pits and dirt and debris on fiber end faces cause reflections and signal loss (insertion loss) that can degrade network performance or even cause complete network failure. Even a tiny speck of dust on a fiber end face can cause enough insertion loss to adversely impact the signal.
Industry standards define specific parameters for quality and cleanliness. The IEC 61300-3-35 standard covers visual inspection of fiber optic connectors and fiber-stub transceivers, focusing primarily on the observation and classification of debris, scratches, and defects. The standard uses specific grading criteria based on the number and size of defects and debris in the core, cladding, adhesive, and contact areas of a fiber end face to determine pass or fail as shown in the chart and graphic below. To give you an idea of the size of the scratches and defects, the core size of most multimode fiber optic cable is 50 μm and the core size of singlemode is 9 μm. Notice that the IEC criteria for singlemode fiber is stricter than multimode due to its smaller core size and single mode (path) of light.

It is highly recommended to inspect fiber end faces for defects and contamination before termination. If the end face is contaminated and fails to pass the IEC criteria, the first step is to properly clean the end face. This should be done using wipes or solvents specifically designed for fiber cleaning as other cleaners are not effective or can make it worse. For example, over-the-counter isopropyl alcohol can leave behind reside that is difficult to remove. After cleaning, best practice is to reinspect the end face.
Inspecting Fiber Optic End Face Geometry
In addition to quality and cleanliness, the performance of a fiber optic link also depends on the geometry of the connector end faces vital to alignment and physical contact of the fiber cores. When two fiber cores in a connection point are not perfectly aligned or have air gaps between them, it can reduce light transmission that increased insertion loss and degrades performance. Poor end face geometry can even cause damage to fibers during mating, including those used within expensive transceiver equipment.
For single fiber end faces, IEC 61755-3-1 standards define fiber end face geometry parameters to ensure good contact. These include:
- Radius of curvature—The roundness of the end face, which can impact contact during mating. If the radius is too low, it can put too much force on the fiber. If it’s too high, it can prevent physical contact.
- Apex offset—The degree to which the fiber end face is centered, impacting the transmission of light from one fiber to another. Off-centered fiber cores lead to reflectance and insertion loss/
- Angle of polish—The surface angle of the end face. Note that APC connectors should be polished at an 8-degree angle, while UPC connectors should have no angle
- Core dip—The degree to which the fiber core is recessed in the ferrule. Core dip can occur during polishing because the fiber core is typically softer than the surrounding cladding. It can create air gaps that have a major impact on insertion loss.
Fiber protrusion—The degree to which the fiber protrudes from the ferrule, which can damage the fiber end face of mated connectors.
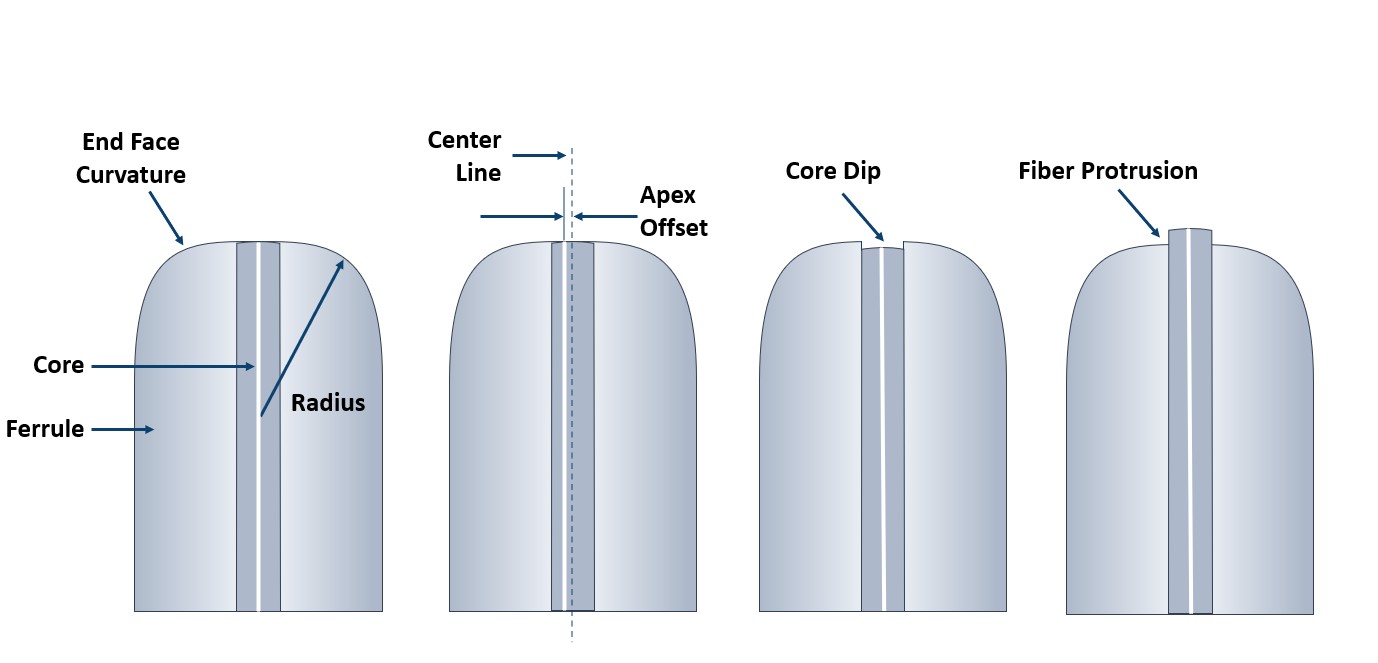
For multi-fiber MPO/MTP connectors, IEC 61755-3-31 standards extend the geometry parameters to also compare all the fibers in the array to each other. For example, IEC standards also specify angle of the polish across the horizontal and vertical axis of an MPO/MTP array and the maximum height differential among all fibers and maximum adjacent height differential.
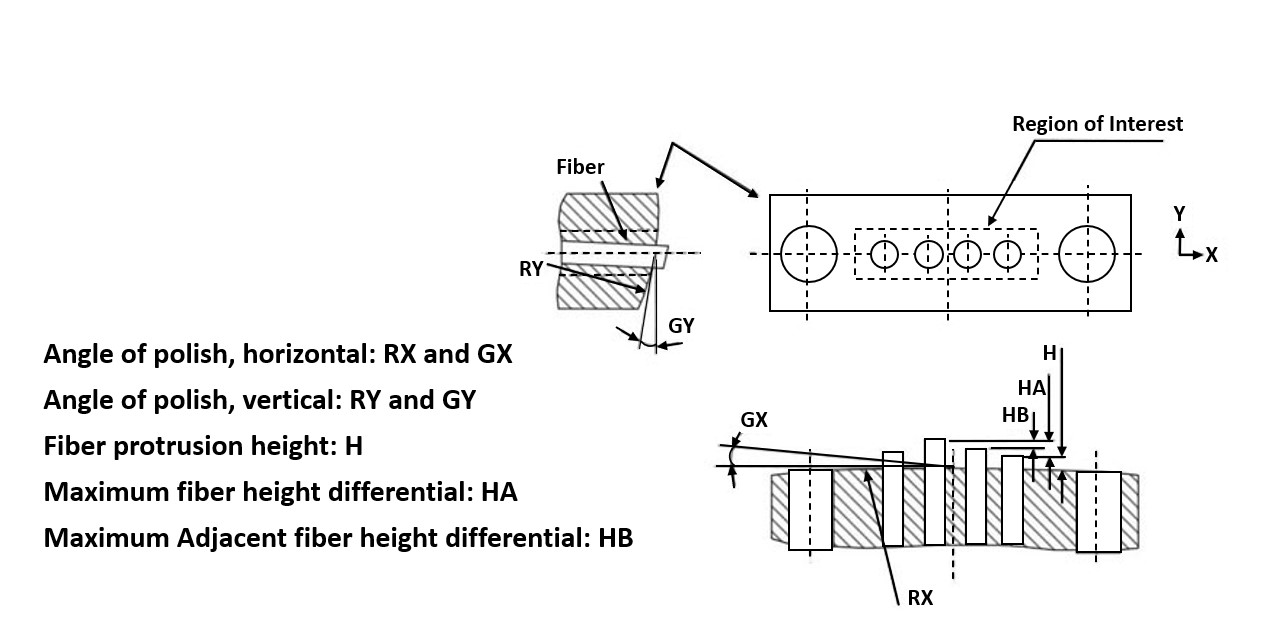
What is Coplanarity in Fiber Inspection?
Coplanarity is a more recent end face geometry parameter for MPO/MTP connectors added to the IEC 61755-3-31 standard. Rather than just looking at the individual fiber protrusion heights and height differentials in relation to the end face surface, coplanarity is measured in relation to the “best fit plane.” The best fit plane is the line that best represents all fiber heights in the connector. The standards specify values for minus coplanarity, which is the distance between the lowest fiber and best fit plane. The lower the number, the better the coplanarity. In other words, if minus coplanarity is zero, all fibers would be exactly the same height.
Coplanarity essentially determines the flatness of an array of fiber. Flatness is vital to making sure that all fibers in a mated MPO/MTP connector pair exhibit good and uniform contact. Poor coplanarity results in higher insertion loss performance that can degrade network performance.
Fiber Optic Inspection Tools
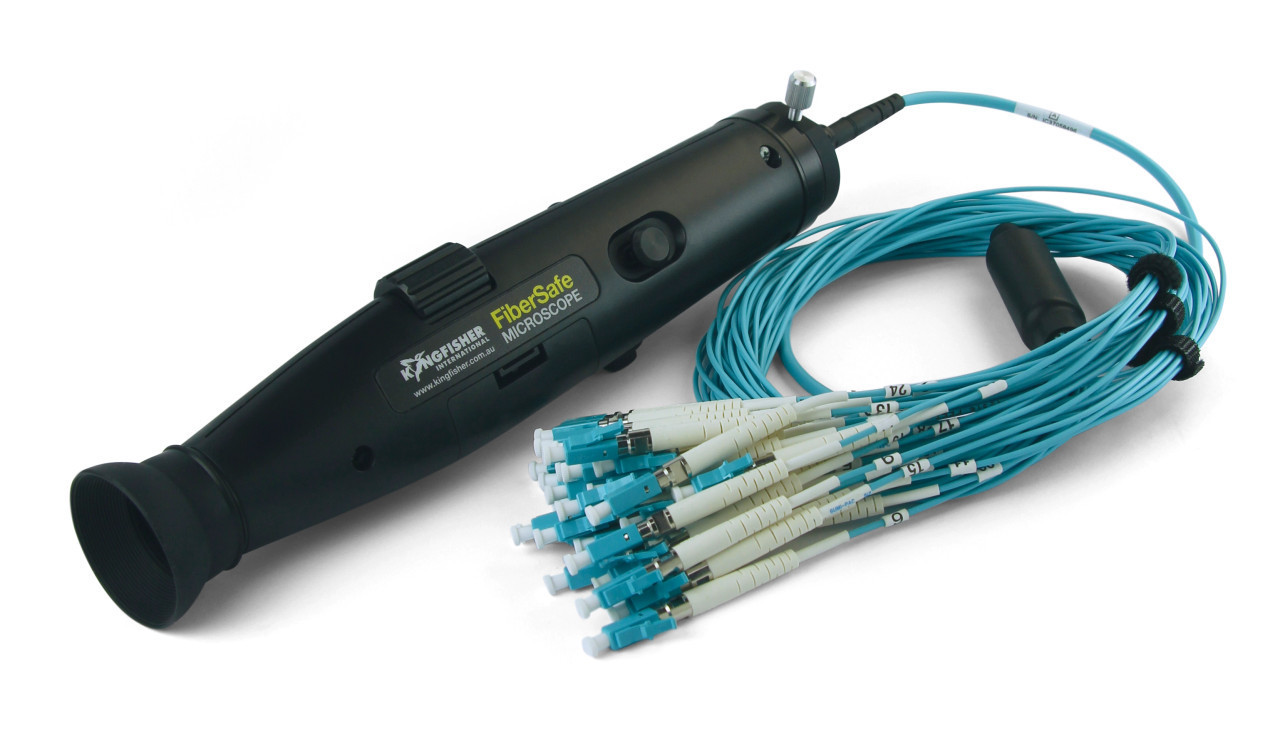
Inspecting fiber end faces for defects and contamination can be done using simple hand-held microscopes, commonly referred to as fiber optic inspection scopes or fiber optic inspection microscopes. Fiber optic inspection scopes are typically available in a 200X or 400X magnification with the ability to focus and center the image. They are typically battery-powered with an illuminating LED, and some can be outfitted with an inexpensive digital camera to capture and store images on a USB drive for viewing on a computer screen. A fiber optic inspection camera is ideal for specifications that require inspection images as part of their testing documentation. It’s important to note that purely manual inspection with a hand-held microscope takes more time and is always subject to human error—what one person sees versus another can vary based on skill, experience, eyesight, and even ambient lighting. This can lead to inconsistent and inaccurate results.
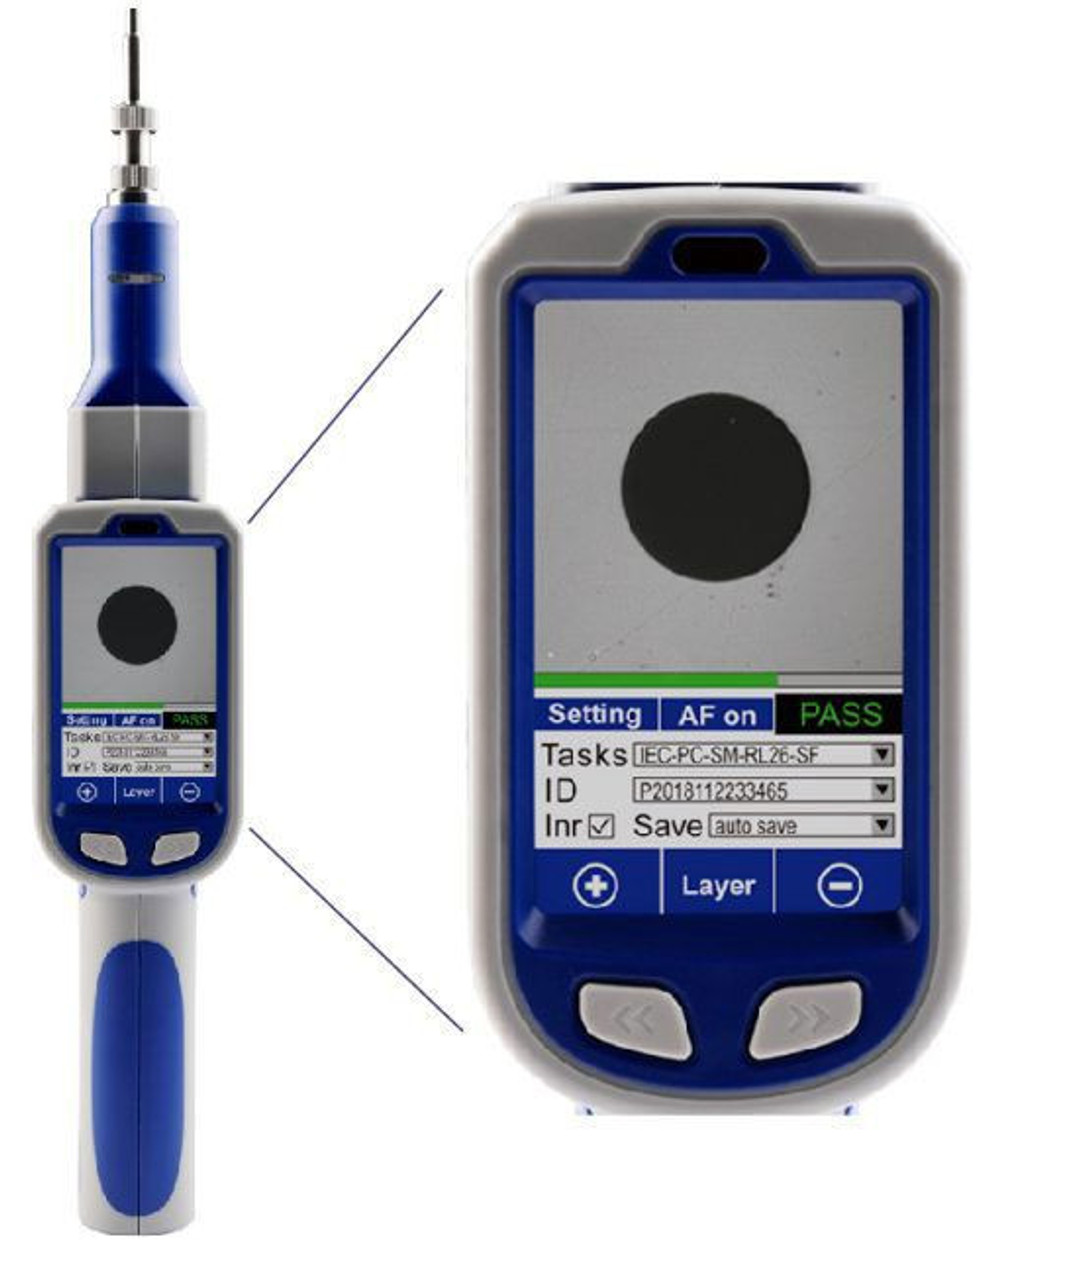
The next step up in fiber optic inspection tool capability (and price) are digital fiber inspection probes. These solutions speed inspection time and improve accuracy with high resolution imaging and automatic focus, centering, exposure, and capture. There are even digital inspection tools with Wi-Fi capability for visually inspecting fiber end faces on mobile devices. More advanced intelligent digital inspection tools are equipped with software that provides auto analysis based on IEC standard or customer-defined criteria, resulting in a simple PASS or FAIL result. Auto analysis doesn’t rely on the skills or experience of the operator, eliminating human error and enabling faster, more accurate, and repeatable results.
When it comes to multi-fiber MPO/MTP connectivity, inspecting end faces for defects, dirt, and debris is more complex since each fiber end face within the array needs to be inspected. Considering an MPO/MTP connector can have up to 72 fibers in an array, selecting an intelligent auto analyzer that can scan and analyze all end faces of an MPO/MTP connector at once provides unparalleled speed and accuracy.
When selecting a fiber optic inspection tool, it’s important to ensure the right interface for the type of connector, typically 1.25mm or 2.5mm ferrule connectors. If using angled polished connectors (APC), it’s imperative to use an APC inspection tip to avoid damaging the fiber end face. Most fiber inspection tools are available with interchangeable tips to inspect a variety of connector types.
While inspecting fiber end faces for defects and contamination is common and best practice before termination and during testing and troubleshooting, inspecting end face geometry is typically conducted in connector manufacturing and fiber assembly processes. However, it has also become a best practice among large hyperscale and cloud data center providers (think Google, Amazon, and Facebook) and service providers (think Verizon and AT&T) who have a vested interest in ensuring proper end face geometry.
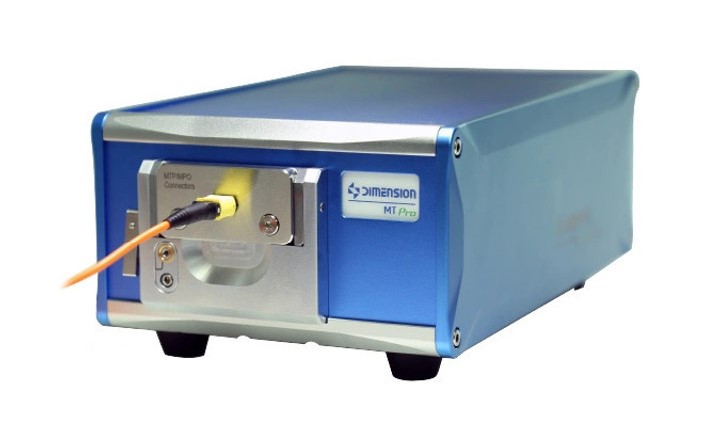
End face geometry inspection is conducted using an interferometer, which has the ability to detect the index parameters of the connector surface’s 3D shape and automatically measure IEC geometry specifications. Repeatability and reproducibility in geometry inspection are integral to ensuring accurate results and improving the efficiency of the process, especially when inspecting on a sampling basis and/or inspecting multiple connector types. Due to the increased complexity of measuring fiber protrusion and core dip differential across multiple fibers in an MPO, it is recommended to use an interferometer calibrated with a high accuracy laser of less than 0.3nm.
The Benefits of Regular Fiber Optic Inspection
Fiber optic inspection is essential to network health. Making defect and contamination inspection a key part of every fiber network installation is a proactive way to prevent potential network issues that can save you time and money in the long run. It should also be the first step in troubleshooting fiber network performance issues since contamination can happen any time a fiber connector is unmated and exposed to the surrounding environment. Clean, defect-free connectors can extend the life of the network and the active equipment they connect to.
While inspecting end face geometry is a key part in fiber connectivity manufacturing and assembly, it’s also a great way to ensure you’re getting quality components from your suppliers.
The good news is that CablesPlus has everything you need for fiber inspection—from simple hand-held microscopes and intelligent digital inspection probes for inspecting for defects and contamination to advanced interferometers to inspect end face geometry and ensure MPO/MTP coplanarity.
Whether you’re a data center operator, integrator, service provider, or fiber assembly house, CablesPlus can help you determine the right inspection tool for your specific needs or provide professional inspection services to help you ensure the quality and performance of your fiber optic connectivity. Contact us today for all your fiber inspection needs.
See Our Full Line of Fiber Optic Inspection Tools Contact an Expert
